2. Providing your own texts in multiple languages
Section outline
-
To offer your own course content in multiple languages, a few things are needed in addition to the translation itself:
- A special course filter must be enabled (usually enabled by default), and
- the different language versions of the text need to be stored accordingly.
-
2.1 Enable the filter
The filter is required for multilingual Moodle courses. There are two of them: an older one called “Multi-language content”, which is needed for the HTML version (see section 2.3), and another one called “Multi-language content v2”, which is needed for the editor plugins (see section 2.2). Both are enabled by default.
If you have editing permissions, you can find the filters under > More > Filters > Multi-language content or Multi-language content (v2):
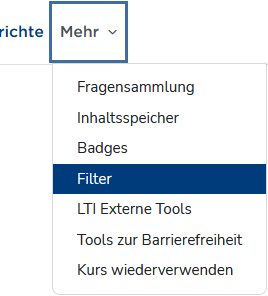
Filters in the “More” menu 
The filter must be enabled -
2.2 Editor plugins
Once the filters are enabled, the available editors include a function for entering multilingual content. Both the Atto editor ...
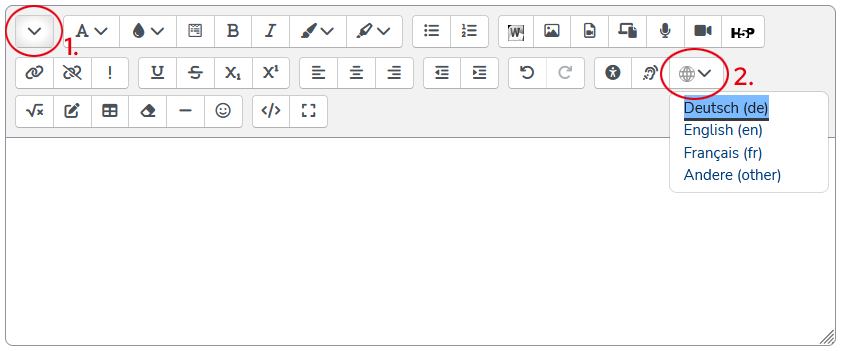
: Multilang button (2) in the second toolbar row of the “Atto” editor. You may first need to show that row (1). ... and the TinyMCE editor will then provide a corresponding button:

Multilang button in the “TinyMCE” editor Using these buttons, you can mark text sections for the respective languages:
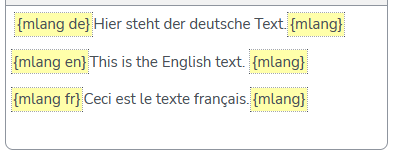
Language tagging in the WYSIWYG editor You can create these language sections either as empty placeholders by simply clicking the button and selecting a language, or apply them to existing text. In that case, select the text first; when you click a language, the selected text will be wrapped in the yellow markers.
The filter “understands” the shortcode and language tag {m lang de | en | fr}, so that
- when using the language switcher,
- when a user preference is set, or
- when a different browser language is detected,
the selected / desired language is shown and all others are hidden.
-
Excursus: HTML vs. WYSIWYG
At the end of the day, Moodle is just a website written in HTML (HyperText Markup Language, info). HTML is a markup language, meaning a way of structuring documents in which both the actual content and properties, relationships, and formatting are described within the same document.
An example:
<h3>Überschrift</h3>
<p>Dies ist der Text, mache Worte sind <strong>speziell formatiert</strong>.</p>In the HTML snippet above, an element of type headline with hierarchy level 3 (= h3) is created. Its beginning is marked by an opening tag (<h3>) and its end by the matching closing tag (</h3>). The content of the element is “Überschrift”, where German umlauts may - depending on the character encoding of the document - be written using the (outdated) entity notation (Ü = Ü).
This is followed by a paragraph (<p>...</p>), in which another string is formatted in bold (<strong>).All websites you see in your browser work exactly like this. Your browser is just kind enough to render the HTML code, meaning it does not show the raw HTML but instead displays the headings, paragraphs, and bold text as such.
Moodle editors, however, work in WYSIWYG mode, i.e. they try to generate standards-compliant HTML in the background from the text you enter. So if you format a text as a list using the editor buttons, for example:
- List item 1
- List item 2
- List item 3
it will appear like that in the editor input area. In the background, however, it is saved as an unordered list (<ul>...</ul>) with several list items (<li>...</li>)
<ul>
   <li>List item 1</li>
   <li>List item 2</li>
   <li>List item 3</li>
</ul> -
All available text editors can be switched to HTML mode: in the Atto editor, use the </> button in the lower toolbar row; in the TinyMCE editor, go to > View > Source code.

HTML button (2) in the second toolbar row of the “Atto” editor. You may first need to show that row (1). 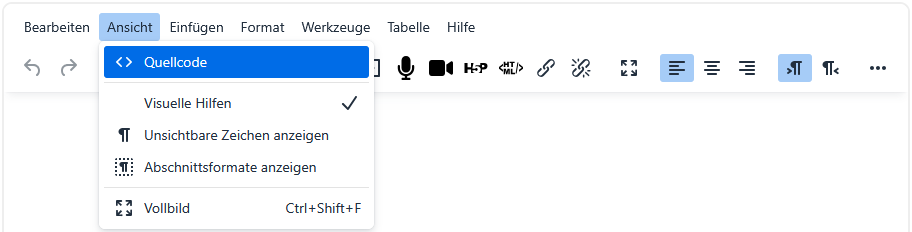
HTML view in the “TinyMCE” editor In the HTML mode now displayed, the different languages are entered as follows: Each language must be wrapped in a <span> element that specifies
- that the "multilang" filter should be applied, and
- which language the text in that element is written in.
An English text would therefore be written as
<span class="multilang" lang="en">
  ... English text goes here
</span>
a German text as
 <span class="multilang" lang="de">
  ... German text goes here
</span>
and a French text accordingly as
<span class="multilang" lang="fr">
  ... French text goes here
</span>
The filter “understands” the attribute class="multilang" and the language attribute (lang="de | en | fr"), so that
- when using the language switcher,
- when a user preference is set, or
- when a different browser language is detected,
the selected / desired language is shown and all others are hidden.
A practical workflow seems to be:
- first write the entire text (source or WYSIWYG),
- then copy it and paste it again with enough spacing (blank lines) in between,
- and only at the end insert the <span> tags in the source code.
This is not exactly user-friendly, but it works 😏