17. Multilingual content
Section outline
-
Moodle can basically handle multiple languages. So-called “language packs” are used for this purpose.
However, these language packs only apply to texts that are an integral part of the learning platform, such as menu labels or automatic texts. And their display depends on several settings. I will try to break all of this down in this course so that all users are able to create multilingual posts, content, or even entire courses:-
1.1 Available language packs
A language pack contains all the texts that are used by default on a “blank” Moodle site: These include, for example, the menu items "Home" and “My courses,” or the automatic naming of buttons, e.g., “Add section,” and much more.
Three languages are currently available: German, English, and French.In the English language pack, the above examples are called "Home", "My Courses" and "Add section", and in French « Accueil », « Mes cours » and « Ajouter une section » :
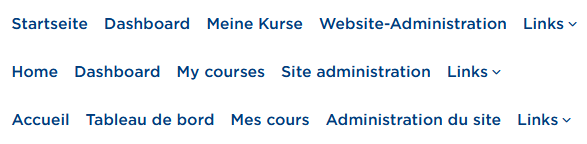
Primary navigation of the interface in three languages 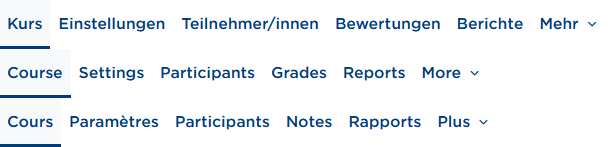
Secondary navigation of the interface in three languages 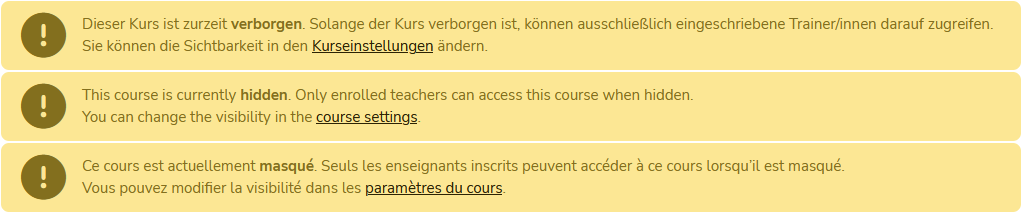
Example note on course visibility in three languages These language packs can, of course, only cover standard texts.
User-generated texts are (unfortunately) not translated automatically. The corresponding options for this are described in sections 2 to 7. -
1.2 Language selection for the user interface
All users can change the language of the Moodle interface. Depending on whether you’re logged in or not, it works slightly differently.
Not logged in:
For visitors who aren’t logged in, there’s a button in the header at the top right that lets you switch the language. On mobile devices (right), it may look a bit different: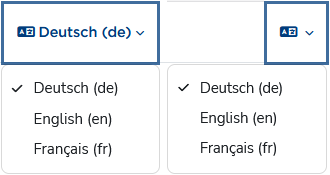
Language switcher in the header Logged in:
After a successful login, the language selection moves into the user menu: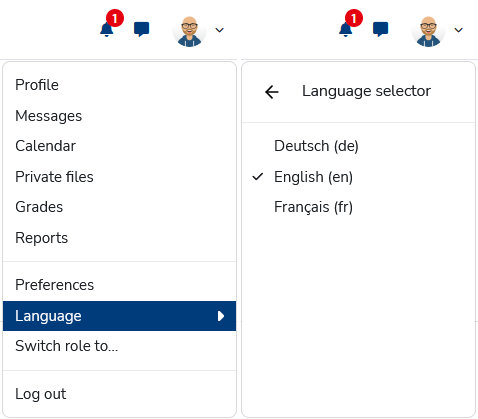
Switch language via the user menu You can test how it works in this course, because it’s available in three languages.
This language selection affects all texts that have multiple language versions. If there’s no translated text available in the target language you chose, the default language (here: German) is shown. -
1.3 Language settings in the user profile
Besides the interface setting, there’s a user-specific preference you can set in your own settings: At https://moodle.thga.de/user/language.php or via User menu > Settings > Select language, you can set a preferred language.
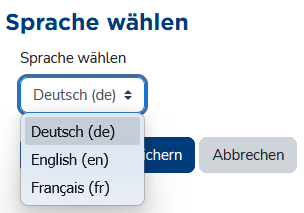
Profile setting for preferred language If no language is enforced (see section 1.4), Moodle is displayed in the preferred language—in short: your personal language preference overrides the interface setting from section 1.2.
-
1.5 Course language settings
Of course, teachers should be able to decide the language of their own courses themselves. There’s a course setting for that, which people with editing permissions can find under Settings > Appearance > Force language.
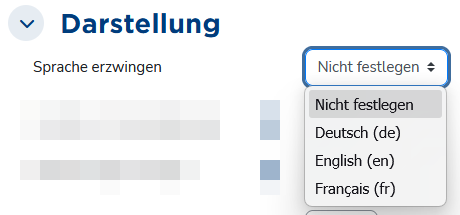
Course language setting A language enforced via the course setting overrides the user preference (section 1.3) and the interface setting (section 1.2).
-
1.6 How the different language settings relate
- By default, Moodle is displayed in German.
- The interface language setting (section 1.2) is available to every visitor—whether they have an account or not, and whether they’re logged in or not—so you can generally view the site in a language different from the default.
If no course setting is applied, courses are also displayed in the selected language, as long as texts are available in that language. - The user preference (section 1.3) is basically a permanent version of the interface setting and overrides the default (here: DE). This means the Moodle interface is always shown in the user’s preferred language. Since the setting is user-specific, it only applies to logged-in users.
This setting also generally applies to all courses you open, as long as texts exist in the target language and no course language is enforced. - At this point—if no interface language has been chosen manually and no user preference has been set—Moodle tries to determine a “matching” language via the browser settings.
- A course language set by the teacher, for example, is not affected by any of the other options. It would be kind of pointless if an English course that is meant to be run exclusively in English for didactic reasons were suddenly displayed in German or French because of a user preference or interface setting.
The following figure is intended to illustrate the relationship:
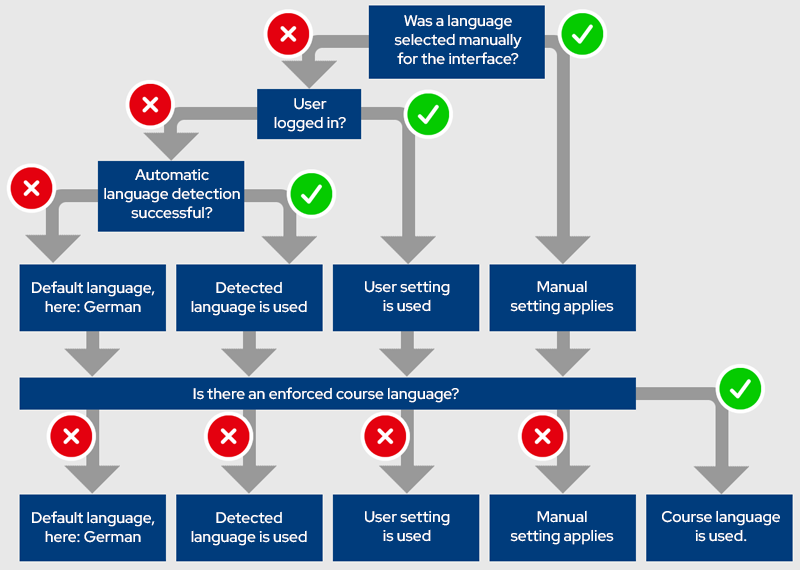
Schematic diagram showing which language setting applies when (figure based on this template)
-
-
To offer your own course content in multiple languages, a few things are needed in addition to the translation itself:
- A special course filter must be enabled (usually enabled by default), and
- the different language versions of the text need to be stored accordingly.
-
2.1 Enable the filter
The filter is required for multilingual Moodle courses. There are two of them: an older one called “Multi-language content”, which is needed for the HTML version (see section 2.3), and another one called “Multi-language content v2”, which is needed for the editor plugins (see section 2.2). Both are enabled by default.
If you have editing permissions, you can find the filters under > More > Filters > Multi-language content or Multi-language content (v2):
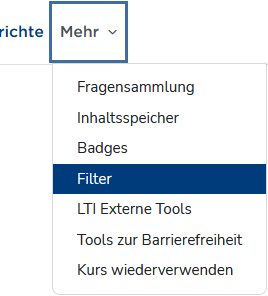
Filters in the “More” menu 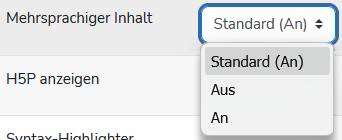
The filter must be enabled -
2.2 Editor plugins
Once the filters are enabled, the available editors include a function for entering multilingual content. Both the Atto editor ...
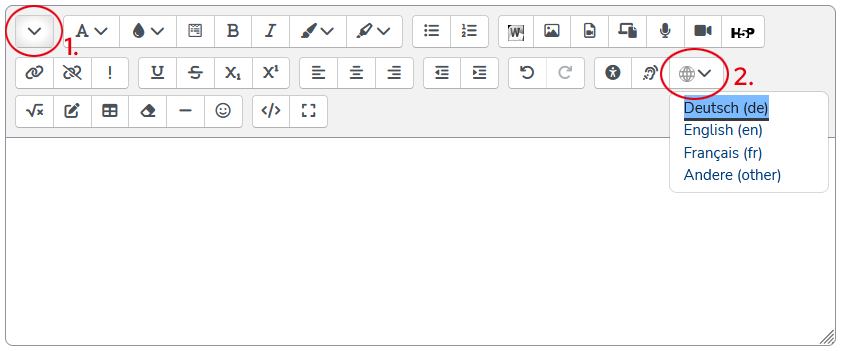
: Multilang button (2) in the second toolbar row of the “Atto” editor. You may first need to show that row (1). ... and the TinyMCE editor will then provide a corresponding button:

Multilang button in the “TinyMCE” editor Using these buttons, you can mark text sections for the respective languages:
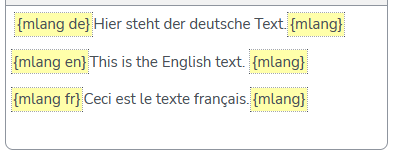
Language tagging in the WYSIWYG editor You can create these language sections either as empty placeholders by simply clicking the button and selecting a language, or apply them to existing text. In that case, select the text first; when you click a language, the selected text will be wrapped in the yellow markers.
The filter “understands” the shortcode and language tag {m lang de | en | fr}, so that
- when using the language switcher,
- when a user preference is set, or
- when a different browser language is detected,
the selected / desired language is shown and all others are hidden.
-
Excursus: HTML vs. WYSIWYG
At the end of the day, Moodle is just a website written in HTML (HyperText Markup Language, info). HTML is a markup language, meaning a way of structuring documents in which both the actual content and properties, relationships, and formatting are described within the same document.
An example:
<h3>Überschrift</h3>
<p>Dies ist der Text, mache Worte sind <strong>speziell formatiert</strong>.</p>In the HTML snippet above, an element of type headline with hierarchy level 3 (= h3) is created. Its beginning is marked by an opening tag (<h3>) and its end by the matching closing tag (</h3>). The content of the element is “Überschrift”, where German umlauts may - depending on the character encoding of the document - be written using the (outdated) entity notation (Ü = Ü).
This is followed by a paragraph (<p>...</p>), in which another string is formatted in bold (<strong>).All websites you see in your browser work exactly like this. Your browser is just kind enough to render the HTML code, meaning it does not show the raw HTML but instead displays the headings, paragraphs, and bold text as such.
Moodle editors, however, work in WYSIWYG mode, i.e. they try to generate standards-compliant HTML in the background from the text you enter. So if you format a text as a list using the editor buttons, for example:
- List item 1
- List item 2
- List item 3
it will appear like that in the editor input area. In the background, however, it is saved as an unordered list (<ul>...</ul>) with several list items (<li>...</li>)
<ul>
   <li>List item 1</li>
   <li>List item 2</li>
   <li>List item 3</li>
</ul> -
All available text editors can be switched to HTML mode: in the Atto editor, use the </> button in the lower toolbar row; in the TinyMCE editor, go to > View > Source code.

HTML button (2) in the second toolbar row of the “Atto” editor. You may first need to show that row (1). 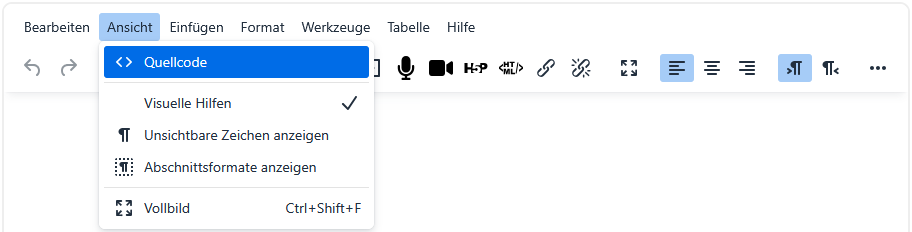
HTML view in the “TinyMCE” editor In the HTML mode now displayed, the different languages are entered as follows: Each language must be wrapped in a <span> element that specifies
- that the "multilang" filter should be applied, and
- which language the text in that element is written in.
An English text would therefore be written as
<span class="multilang" lang="en">
  ... English text goes here
</span>
a German text as
 <span class="multilang" lang="de">
  ... German text goes here
</span>
and a French text accordingly as
<span class="multilang" lang="fr">
  ... French text goes here
</span>
The filter “understands” the attribute class="multilang" and the language attribute (lang="de | en | fr"), so that
- when using the language switcher,
- when a user preference is set, or
- when a different browser language is detected,
the selected / desired language is shown and all others are hidden.
A practical workflow seems to be:
- first write the entire text (source or WYSIWYG),
- then copy it and paste it again with enough spacing (blank lines) in between,
- and only at the end insert the <span> tags in the source code.
This is not exactly user-friendly, but it works 😏
-
Besides the text fields edited with the editor, there are of course many other text elements. For example, course titles, section names, and activity names are entered in input fields without an editor. Both methods for storing multiple languages also work there.
For example, this course is called
17. {m lang de}Mehrsprachige Inhalte{m lang}{m lang en}Multilingual content{m lang}{m lang fr}Contenus multilingues{m lang}
Alternatively, the “older” technique would also work, and the title could be written as
17. <span class="multilang" lang="de">Mehrsprachige Inhalte</span><span class="multilang" lang="en">Multilingual content</span><span class="multilang" lang="fr">Contenus multilingues</span>
However, that version is a bit less handy, and there is a greater risk of hitting the character limit of the input fields because it is simply longer. The numbering (here: "17." + [space]) can be left outside, by the way, since it applies to all languages.
The same works for sections and for naming materials or activities:

Multilingual tagging also works for course names ... 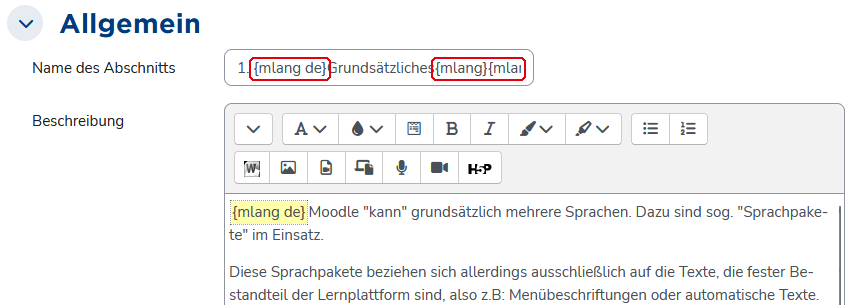
... as well as for section names ... 
... and for activity or material names.
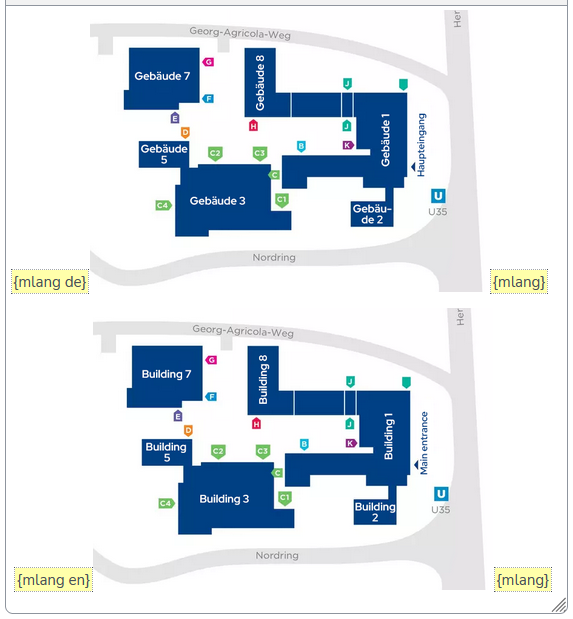
If images contain text (for example labels), the graphic itself must be stored multiple times if it is supposed to appear differently in different languages. Here too, tagging via {m lang} or <span class="multilang"> works:
To control the display of, for example, documents available in several languages, so-called restrictions can be used. For most course elements, these can be configured in the respective settings:
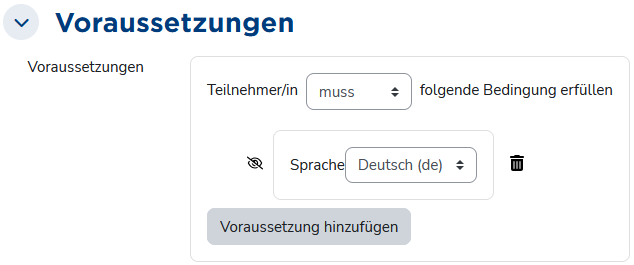
In the course (when edit mode is turned on), it then looks like this:
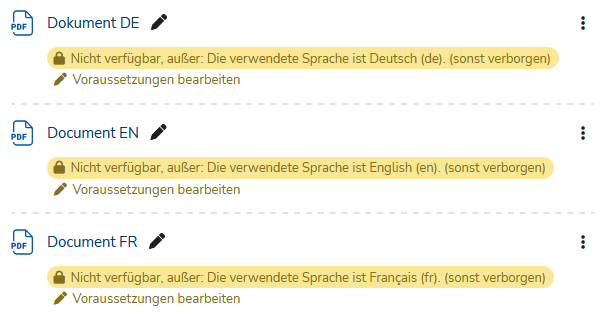
The setting “otherwise hidden” (crossed-out eye icon) makes activities and materials whose restrictions are not met completely invisible. You can test that here:
Videos are of course supported by Moodle, and when embedding videos, you can also provide multiple subtitle tracks in different languages. Visitors can then use the button to select a subtitle language:
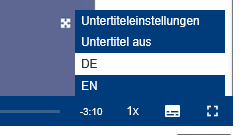
Here you can try switching between different subtitle tracks.
For this, the subtitles must be available in "Web Video Text Tracks Format" (WebVTT, file extension *.vtt). These can, for example, be created automatically using transcription tools and translated if needed. The format looks like this:
WEBVTT

00:00:21.000 --> 00:00:24.000
Hallo und herzlich willkommen zur Video-Anleitung

00:00:24.000 --> 00:00:26.000
Erste Schritte auf der Lernplattform,

00:00:26.000 --> 00:00:28.000
in der ich gerne ein Überblick über die Lernplattform

00:00:28.000 --> 00:00:31.000
der Technischen Hochschule Georg Agricola geben möchte.
As long as the timecodes—that is, the timestamps that determine when each subtitle snippet is shown—are not changed, creating another language version is fairly easy. The English counterpart of the German excerpt above would look like this:
WEBVTT

00:00:21.000 --> 00:00:24.000
Hello and welcome to the video tutorial

00:00:24.000 --> 00:00:26.000
"First Steps on the Learning Platform,"

00:00:26.000 --> 00:00:28.000
where I'd like to provide an overview of the

00:00:28.000 --> 00:00:31.000
learning platform of the Technical University Georg Agricola.
*.vtt files can easily be created in a text editor. If you already have a *.txt file, you can simply change the file extension from *.txt to *.vtt.
- Enter language tags directly:
When using the WYSIWYG variant directly in the text editor, the{m lang}tags do not necessarily have to be inserted via the button; you can also just type them directly into the text field. - Remove unnecessary spaces:
When the{m lang}tags are inserted using the corresponding button, they may include spaces before and after them, which can affect the display. These spaces can be removed without affecting the multilingual functionality.